
.png)
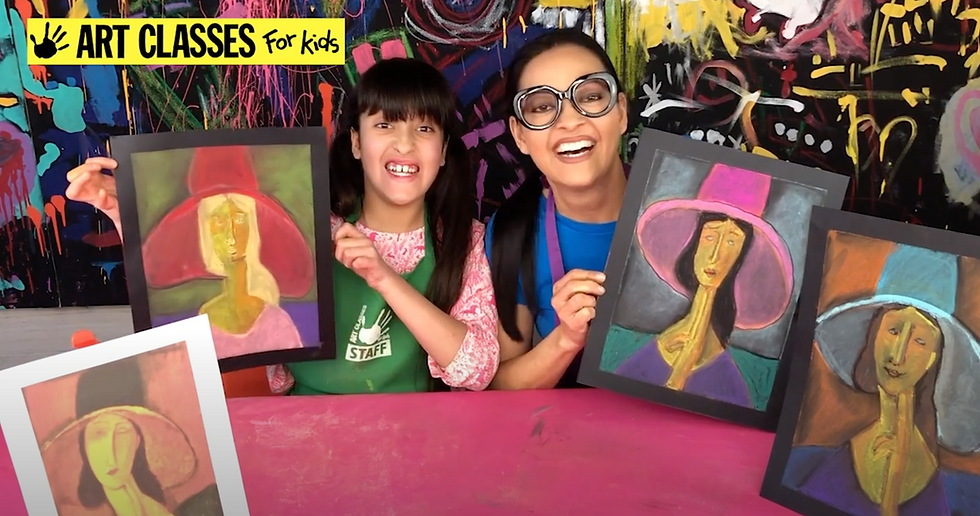
How to Draw a Modigliani Inspired Chalk Pastel Portrait
- Art Classes for Kids

- Apr 1, 2020
- 7 min read
Artists of Any Age Can Make This Cool Art!
About the Artist: Amadeo Modigliani

Amadeo Modigliani (or Modigliani) was a Jewish painter born in Italy in the 19th century. He started painting when he was young in Italy and moved to Paris to study art. He contracted tuberculosis when he was only 16 years old and ultimately passed away at 35 years old, but with his illness he still studied and made amazing art.
Modigliani is primarily known for his unique style of portrait. The faces and necks of his subjects are very elongated and exaggerated. One of his most famous paintings is this one. This portrait is called Portrait of a Woman with a Hat, and it's actually actually a drawing of his wife! This portrait is a super famous drawing of a woman in a hat. It looks really complex, but we'll break it down and make it super fun to do.
What You'll Need
- Sheet of Black Paper
- Chalk Pastels
- Masking Tape
First, let's use masking tape around the edges of our paper so that way, at the end of our project, we can take the tape off and our art will have a border, like a frame. Beautiful!
Step 1: Organize Your Composition

Once you're ready, let's find a color for your subject's skin, like a tan or a brown color. In the middle of the paper, draw a tiny dot. That marks halfway down. Make a U shape for the face that touches the dot we just drew - that will be her chin!
PRO TIP: if you make any mistakes with chalk pastel, you can smudge it out and cover it with chalk later.
Now let's draw the brim of her hat. At the top of your tall face, draw a slight rainbow curve to start drawing the hat. Her hat is HUGE, so let's draw a line that goes all the way to the edge of the paper, draw that curve to go all the way around back to the bottom of your chin.
PRO TIP: if you have chalk dust as you go, just tap, tap, tap your paper rather than blowing the chalk everywhere!
Then, let's draw her neck. Draw two lines going down for your subject's neck. Then, draw two lines going out and diagonal for her shoulders. Her shoulders are very narrow! Draw those all the way down to the bottom of your paper, close to the corners. Finally, draw the collar of her dress. We'll draw a U shape that goes pretty far down, but not all the way to the bottom of the paper.
Step 2: Build Your Composition

Now that we've got the basics of our composition together, let's build on that with a few more details. Next, we'll draw the hair. Keep using your skin color for these steps - we'll go over these with the color hair you want later on. You can do your own hair style, too, but if you want to try and do what Modigliani did, follow these steps.
At the top of the head, draw two curves to either side where her part will be in the front. On the left side, draw some hair close to the head and a bubble close to the chin, which kind of looks like a curl. The hair is asymmetrical, or not symmetrical, so it's different on the right side. On the right, start drawing hair close to the head, and then a bump all the way down to her shoulder. Her hair looks like its folded over to the right!
Right above where the hair touches the shoulder, we'll start drawing the brim of the hat on the right hand side. Draw a big curve that almost touches the edge of the table and connects up at the brim we did earlier. Above the brim edge, double it at the top, and make the brim really thin on the sides until it touches the curve. Then, draw the top of the hat touching the top of the paper.
PRO TIP: you can adjust as you go! If you make an error or want to make a change, just smear your chalk a little and re-draw your lines the way you want.
Step 3: Draw Hand and Face Details

We just have a few more details to outline and then we can start coloring! First, let's start drawing details on the face. Using the same skin color we've been using for the other steps, start by drawing two horizontal lines at the top of the face for the eyebrows. Then, draw two skinny lines close to each other in the face which will be the nose. Draw a little u shape at the bottom of the nose to connect the two lines for the tip of the nose. Then, on the side, draw a little C curve for the nostrils. Finally, under the eyebrows, draw two teeny tiny lemon shapes for the eyes. Last, we'll draw the lips. Start with a smile curve for the middle of the lips, and add a curved M on top for the top lip. Draw one more smile curve underneath for the bottom lip, and you're set with drawing your face details!
Now, let's move onto something a little more advanced: the hand. She's posing like she's thinking in this picture, so we're going to do the same thing Modigliani did. If you want to skip the hand, you don't have to do it. Starting at the top of the neck where it touches the chin, start with drawing a line all the way down that curves down to the bottom of the paper. Draw two skinny fingers to the left of that line. Now you can see the two fingers touching her chin that make her look like she's thinking! Next, draw a curve out to the left of the hand - this will be her other few fingers. Draw two curves inside that, with two smiles on the ends of the fingers. Then, draw a line that goes all the way down to draw her wrist and arm.
Step 4: Color In the Skin with a Base Color

PHEW! That was a complex drawing, but you did it! Now you're ready to move onto the next part - coloring! Start by finding your skin color. It can be tan, brown, yellow, peach, whatever you want it to be. We'll use a few and blend, so this color will be your base color. Start by coloring in your face all the way. Don't lose your features and try to color around all of the guidelines you drew. Once your face is all the way filled in, use one finger and smudge your face.
After you've finished with your face, do the same thing to your neck! Color in your neck with your color and use one finger to help blend it to soften it after you've filled it all the way in. Finally, color in your hand the same way, smudging once it's filled in to soften the color.
Step 5: Add Shading and Perspective

Let's add some perspective to the face. The light will be coming from the left side of the face, so the right side will be darker. Find a pastel that's a little darker than your base skin color and shade in your face on the right hand side. Don't smudge it this time- just tap, tap, tap so that it still shows the base color coming through. Do the same thing around the left eye with your darker color. Finally, do the same thing on the right side of your hand and your shoulder. Remember, tap, tap, tap!
Let's add some more detail with extra shading. Find a darker color pastel and shade underneath the chin a little bit, and around the nose on the shaded side. You can also shade the eyebrows a little bit and underneath the fingers, too. Using your brown, color the outline of your eyes.
Step 6: Start Coloring!

Let's add some more detail! Find a bright color that you like for the eyes. Fill in the shape with your bright color and then add a little bit of a dark version of your eye color on the top edge of the eye. Next, let's pick a color for the background. Where her shoulders are, draw a line all the way through (stopping at your subject, of course!) to draw what looks like a chair or a couch behind her. Color in your background underneath your line.
Next, let's color in some hair! Pick ANY hair color you want, and fill in your hair. Don't forget to go over the guideline you drew earlier, too! Fill in all of your hair and the bangs. You can also do the same thing to fill in your lips very carefully! Using a black pastel very carefully, outline the lips.
Once your hair is done, let's start coloring in your hat. You can do a two-tone hat with two totally different colors, or you can pick a dark and a light hue of the same color. Start with using your dark color for the top of the hat above her head. Make sure you go over the guidelines you drew earlier, too. Using your second color, fill in the edge of your brim super bright. Then, lightly fill in the entire brim and use your finger to smudge it so you have different values of your color in your hat.
Color in the shirt or dress, too, with one of your colors. Make sure to fill it in completely and go over your outline! Blend that in with one finger and you're ready to move onto the next step.
Step 7: Color Your Background

Now, pick any color you want to fill in the rest of the background. Make sure to color all the way around your subject and smudge it with one finger to help blend it. Color all the way to the tape edge, and don't worry if you color on top of it. Making sure your color goes all the way to the edge of the paper means we'll have an awesome frame!
Step 8: Add Shadows

Our last step for this chalk pastel is to add shadows! Using a black colored chalk pastel, we'll add accents to the background like Modigliani did. Pick a corner to add a little bit of black and smudge it in. Then, do the same thing in the other top corner. Add another black shadow above the couch in both corners.
On the outside edge of the hat, draw a skinny black line around the brim of the whole hat. You can add a few more shadows, too, if you want them in different places.
The Final Product!


Comments